

Let’s build your chatbot today!
Launch a no-code WotNot agent and reclaim your hours.
*Takes you to quick 2-step signup.
Your competitor has a chatbot on their website. So does the SaaS tool you signed up for last week. So does your dentist's clinic.
At some point, the question stopped being "should I get a chatbot?" and turned into "why don't I have one yet?"
If that's where you are, you are not late.
But to be clear, this gap can cost you in missed leads, slow response times, and support hours spent on questions a bot could handle in seconds.
In this guide, I'll walk you through how to create a chatbot from scratch, step by step, without writing code. Whether you need a simple rule-based flow or a full AI-powered assistant, you will have a working chatbot by the end.
What Is a Chatbot (and Does Your Business Actually Need One)?
A chatbot is software that interacts with users through conversation, either on your website, WhatsApp, Messenger, or other messaging channels. It can answer questions, collect information, route visitors to the right team, and, in the case of AI chatbots, generate responses from a knowledge base without scripted answers.
The better question is whether your business has a problem a chatbot can solve.
And the pattern I have seen across hundreds of deployments is this: if your team spends more than a few hours a day handling repetitive, predictable requests, a chatbot is not a nice-to-have. It is an operational fix.
The tricky part is that most teams don't see the problem clearly until they look at their data. They know support feels slow. They know agents seem busy.
But they haven't pulled their last 30 days of tickets and asked: how many of these could have been handled without a human?
When they do, the number is usually between 40% and 60%.
That is the real starting point for building a chatbot, not the technology, but the realization that a significant portion of your team's time is going to work that does not require human judgment.
Types of Chatbots: Which One Do You Actually Need?
Before you build anything, you need to decide what kind of chatbot fits your use case. There are three practical options, and the right one depends on how predictable your conversations are.
Parameter | Rule-Based | AI-Powered | Hybrid |
Setup time | Hours | A day or two | 1-2 days |
Handles varied phrasing | No | Yes | Yes (for AI sections) |
Predictability | Complete | Depends on knowledge base quality | High with structured fallbacks |
Best for | Lead capture, booking, simple FAQ | Open-ended support, product questions | Most real-world business use cases |
Maintenance | Update flows manually | Update knowledge base | Both |
Rule-Based Chatbots (Decision Trees)
These follow pre-defined paths. You design the conversation as a flow: the bot sends a message, the user clicks a button or types a response, and the bot follows the branch you mapped out.
No AI involved. They work well for appointment booking, lead qualification with fixed criteria, and FAQ flows where the questions and answers don't change often.
Setup is fast, and the behaviour is completely predictable.
AI-Powered Chatbots
These use large language models (LLMs) to understand what a user is asking and generate responses from a connected knowledge base.
The user can type naturally, and the chatbot interprets intent rather than matching keywords.
They are the right choice when your customers ask the same types of questions but phrase them in dozens of different ways, which is most customer support scenarios.
Hybrid Chatbots (the Practical Middle Ground)
Most businesses end up here.
The chatbot uses a structured flow for things like collecting contact information or routing users to the right department, and switches to AI when the user asks an open-ended question.
This gives you control where you need it and flexibility where it matters.
I’ll give you a quick example of a really effective rule-based chatbot.
We worked with Blue Chip Worldwide on a Valentine’s campaign where the goal was simple: help users pick the right wine.
So… instead of showing a catalog, here’s what the chatbot did:
It asked users a few simple questions about their preferences
It understood their taste
And recommended the most relevant options
Behind the scenes, this was just a well-designed conversational flow. But to the user, it felt like a guided experience.
And it worked… the bot handled thousands of conversations and delivered personalized recommendations at scale.
|
Let’s build your chatbot today!
Launch a no-code WotNot agent and reclaim your hours.
Let’s build your chatbot today!
Launch a no-code WotNot agent and reclaim your hours.
How to Create a Chatbot: 5 Steps and Your Chatbot Is Ready
The build itself is the easy part. The decisions you make before and during the build are what determine whether the chatbot actually works. Here's the sequence that gets both right.
Step | What You Do | Time It Takes |
Step 1 | Define what your chatbot will handle, what success looks like, and what it should not attempt | 30 minutes |
Step 2 | Sign up for a no-code platform and open the bot builder | 5 minutes |
Step 3 | Build your chatbot: pick a template (rule-based) or add an AI Agent block and connect a knowledge base (AI-powered) | 30 min to 2 hours |
Step 4 | Test every conversation path, edge case, and fallback | 30 minutes |
Step 5 | Deploy to your website or messaging channel, then measure for 30 days | 10 minutes to deploy |
Now, let’s have a look at the comprehensive picture of how this entire process looks:
Step 1: Define What Your Chatbot Will Do
This is the step most tutorials skip over, and it is the one that determines whether the chatbot actually works.
Before you open any platform, write down three things:
The specific interactions this chatbot will handle. Not "customer support" broadly, but the actual queries. Order status checks. Pricing questions. Appointment booking. Return requests. Be specific with what you want it to handle.
What a successful conversation looks like. Does the chatbot resolve the query on its own? Does it collect information and pass it to a human? Does it book a meeting? Define the exit point.
What the chatbot should NOT attempt. Complaints that require empathy, complex technical troubleshooting, or anything involving sensitive account data. These stay with your team.
The specificity matters because it directly affects what you build next.
A chatbot designed to "handle customer questions" will be vague and unhelpful.
A chatbot designed to "answer pricing questions, qualify inbound leads by company size and use case, and book demo calls" is something you can actually build and measure.
If you are not sure which use cases to start with, pull your last 30 days of support tickets or live chat transcripts. Sort by volume. The five most frequent request types are your automation candidates.
Step 2: Sign Up and Open the Bot Builder
For this walkthrough, we will use WotNot, a no-code chatbot builder with AI capability, multichannel deployment, and native CRM integrations.
Once you sign up, you land on the welcome dashboard. WotNot lays out the process in four steps right on the screen: Build the chatbot flow, Create your knowledge base, Test your bot, and Deploy the bot.
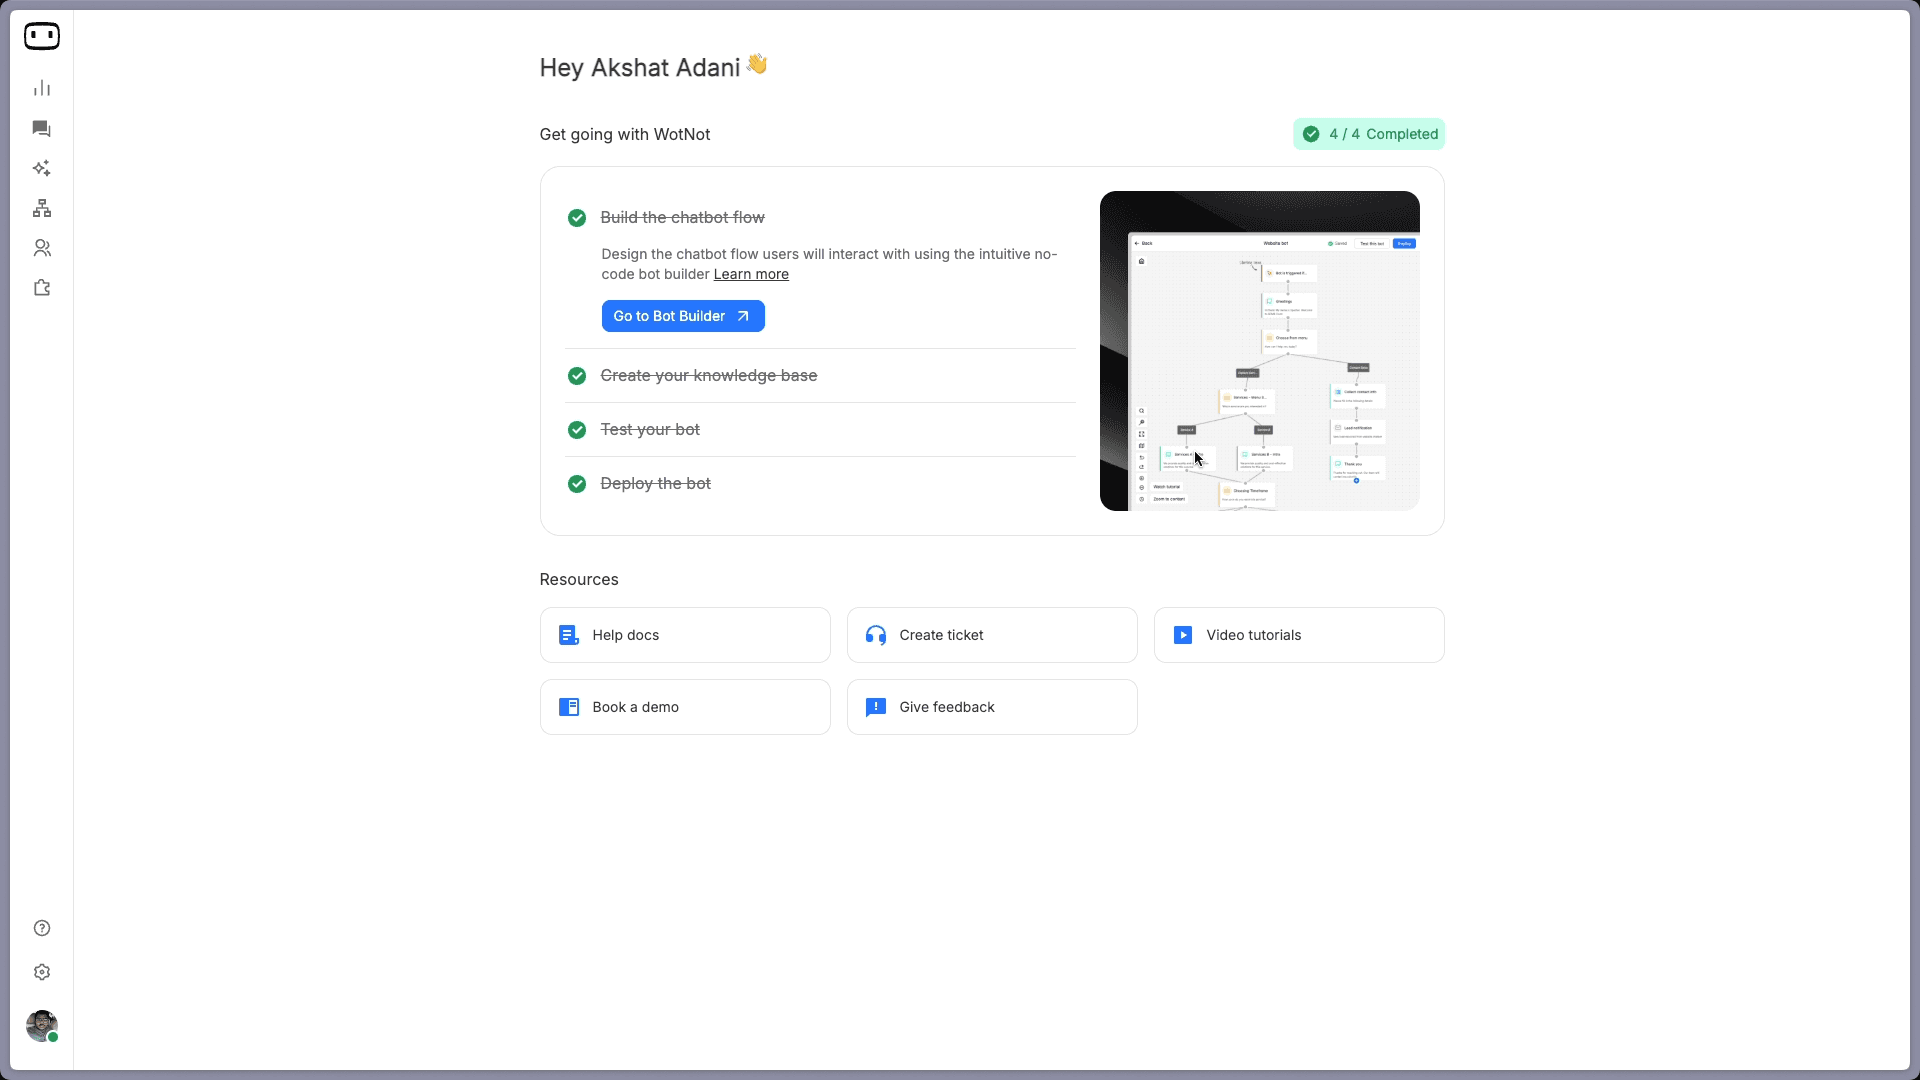
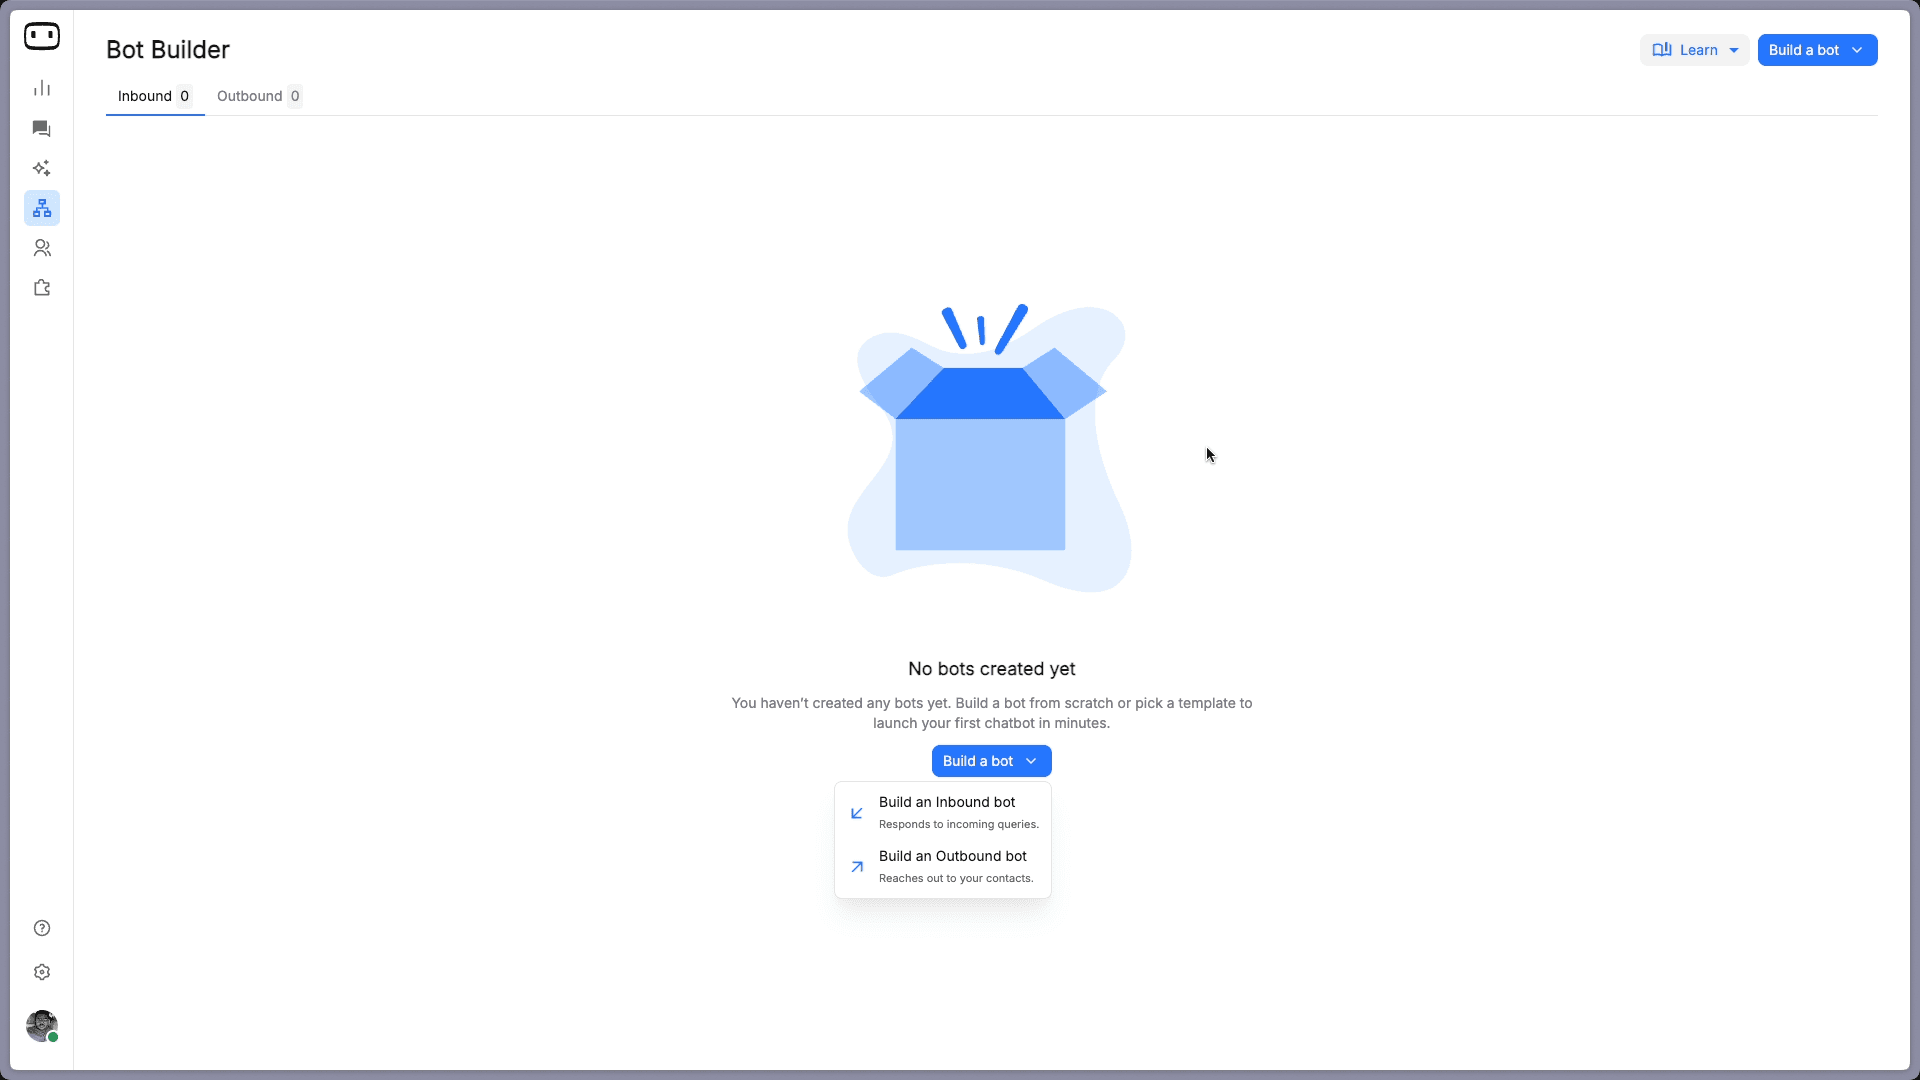
Click "Go to Bot Builder." You will see the Bot Builder page. Click "Build a bot" and select "Build an Inbound bot," which is the type that responds to incoming queries from visitors on your website or messaging channels.
Step 3: Build Your Chatbot
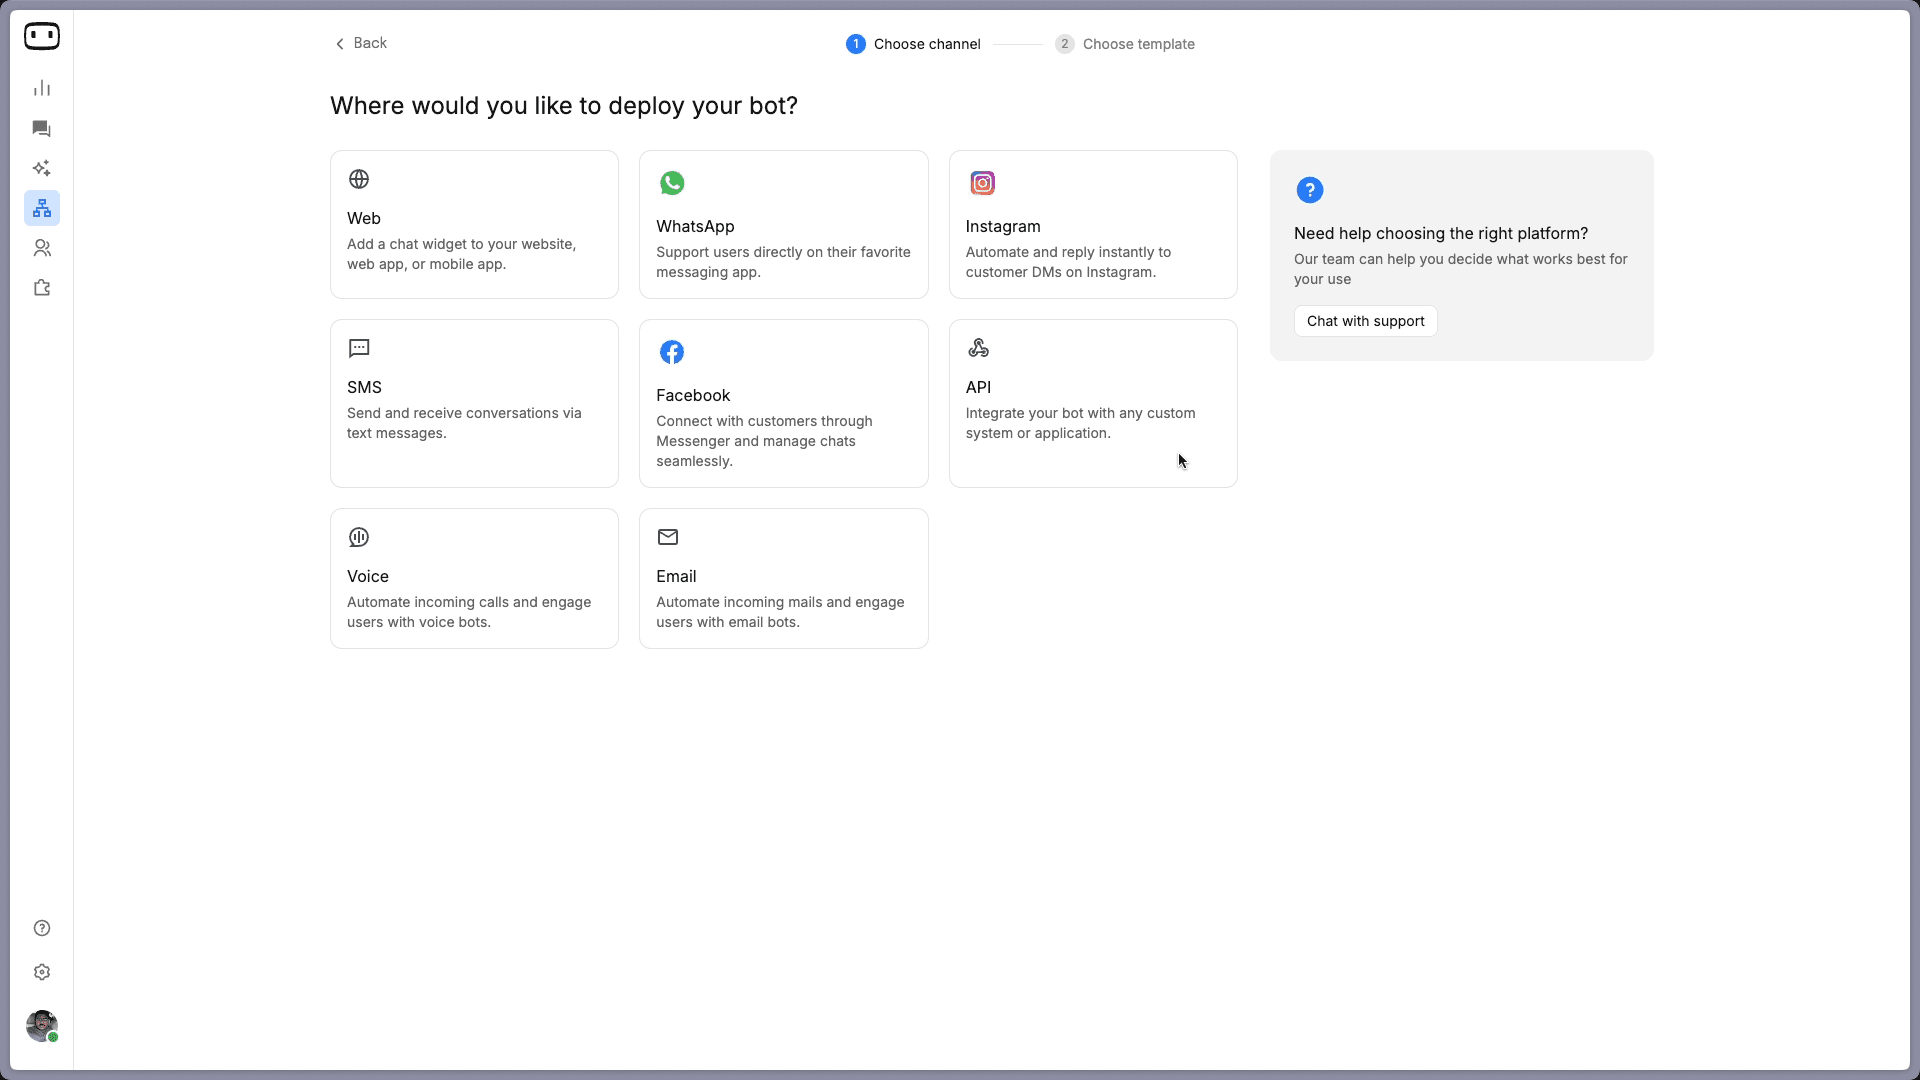
The first thing the platform asks is where you want the chatbot to live.
For most businesses starting out, the Web is the right pick. It adds a chat widget to your website.
If your customers primarily reach you through WhatsApp, Instagram, or Messenger, select those instead. You can always add more channels later.
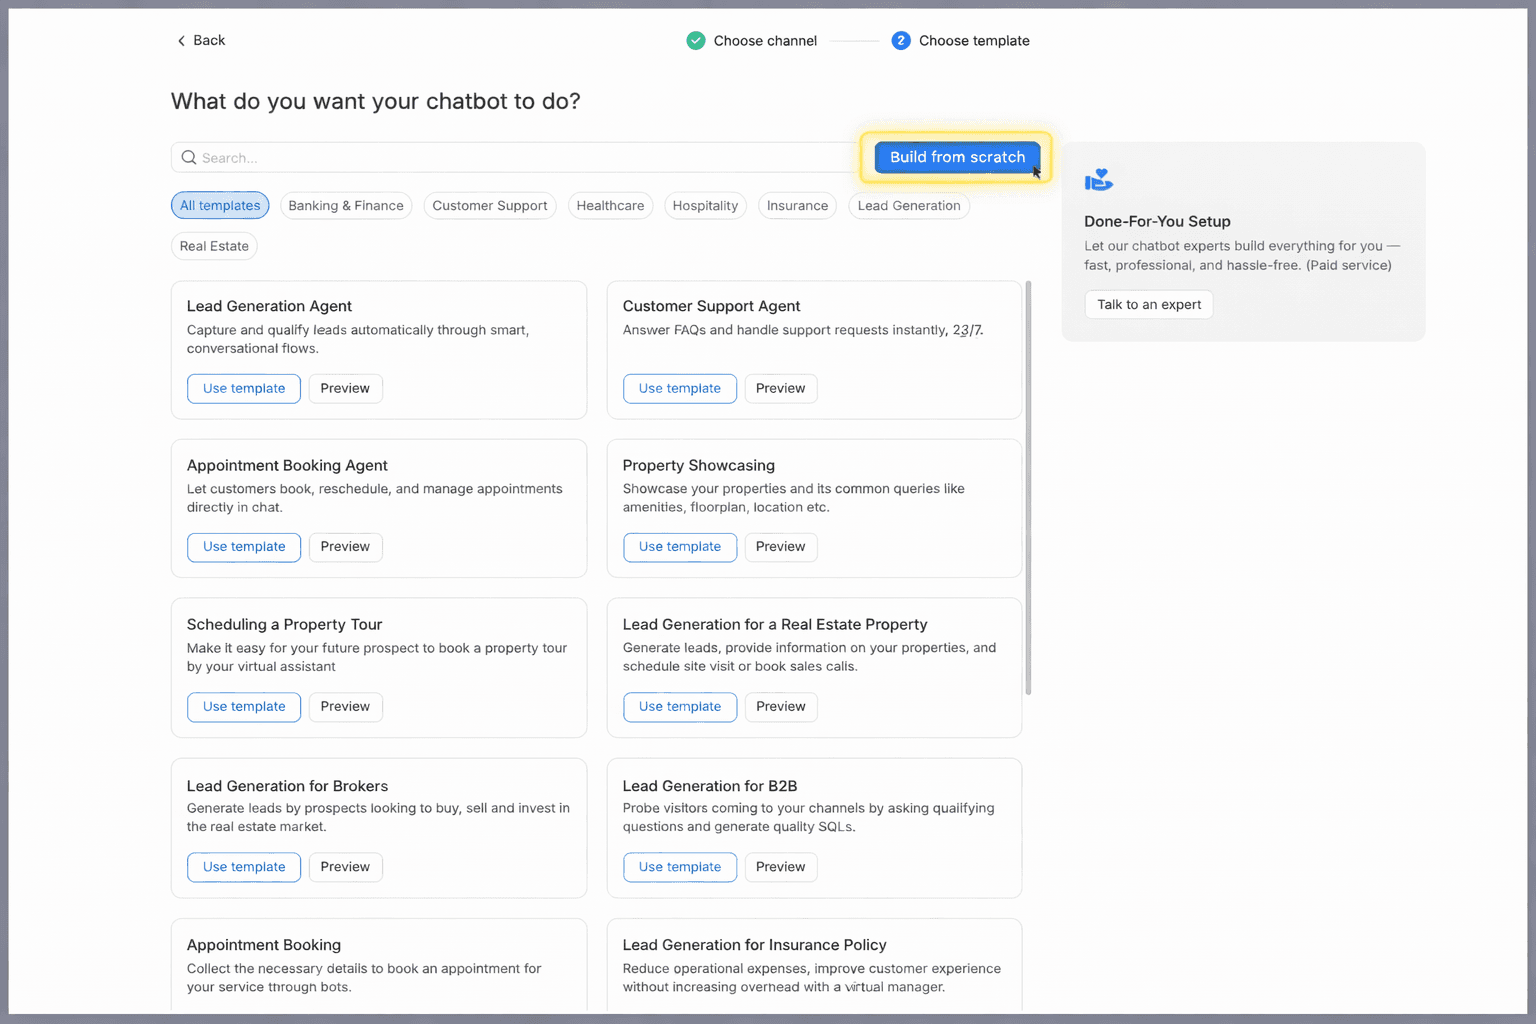
After selecting your channel, you arrive at the decision that shapes everything: use a template or build from scratch.
Templates are faster. Building from scratch gives you more control, and it is the path you will take if you want an AI-powered chatbot.
Here is how each path works.
Using a Template (the Fastest Path)
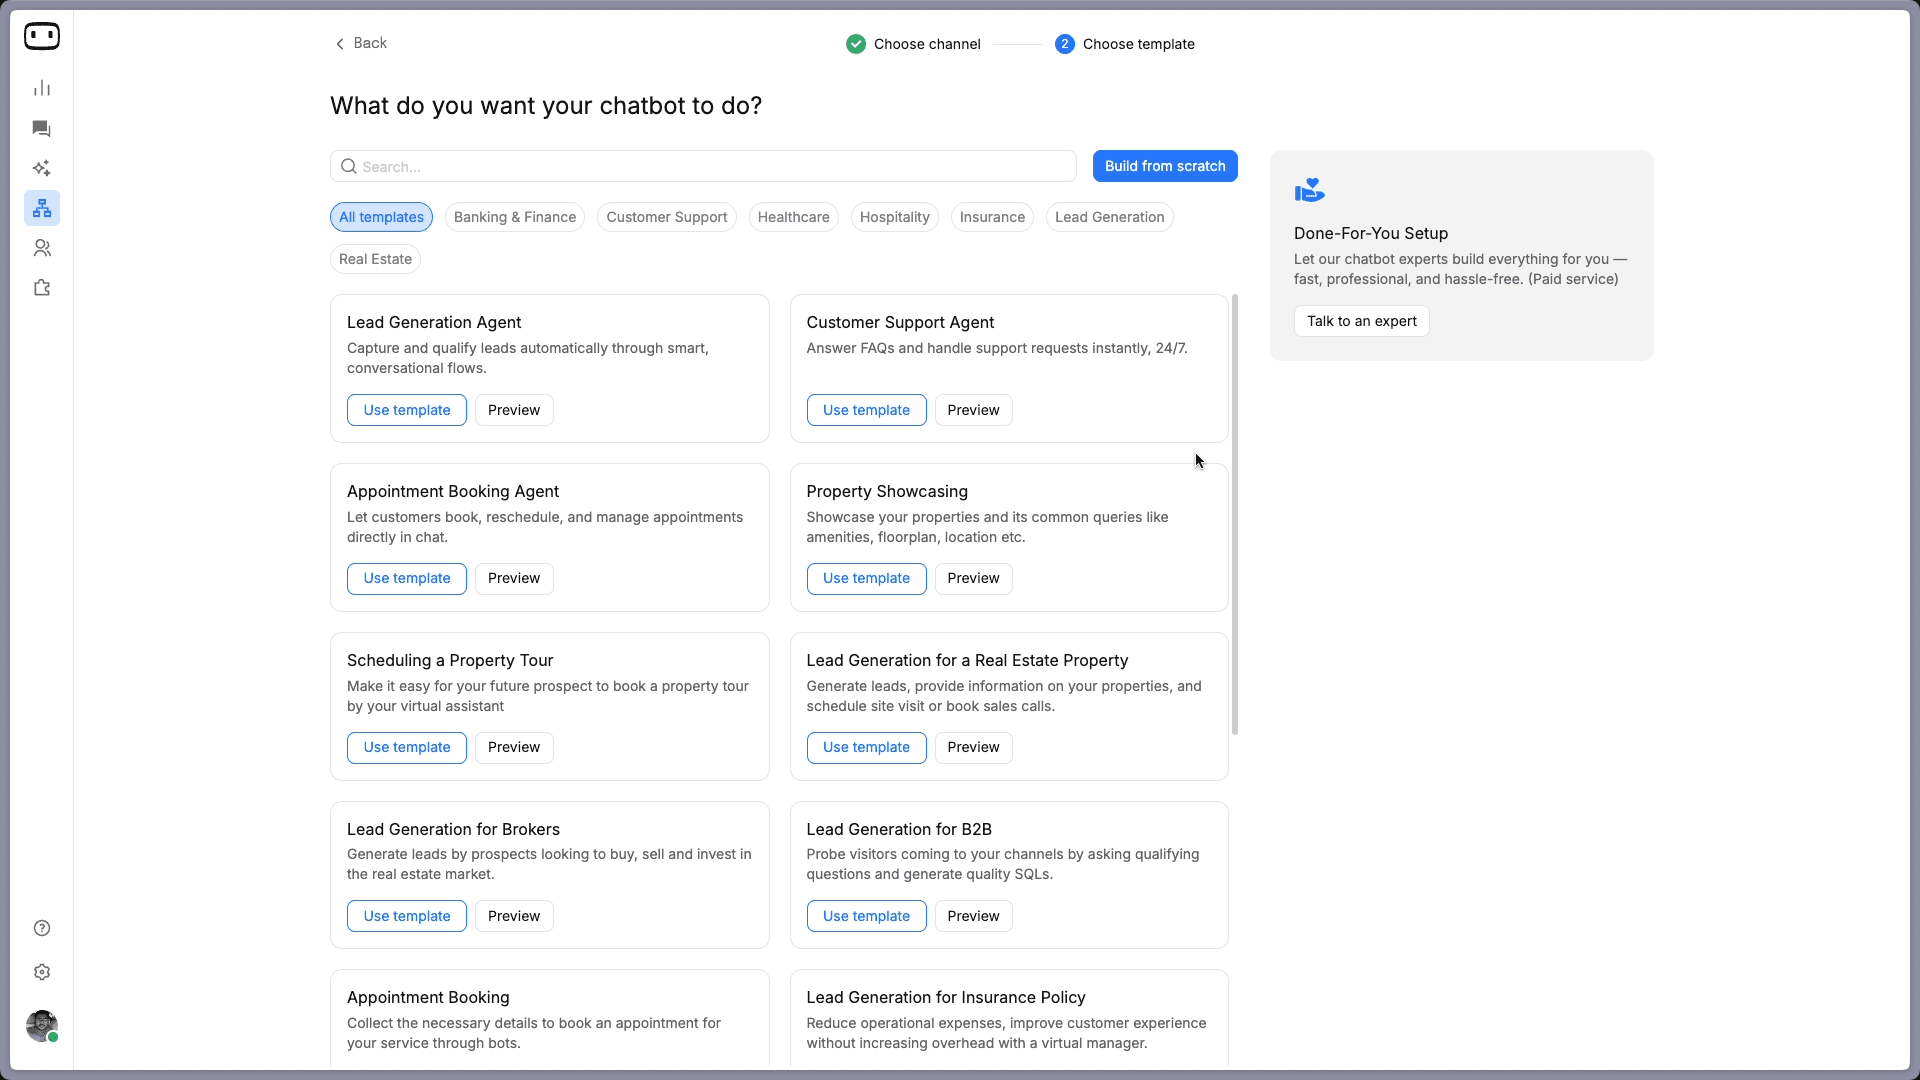
WotNot offers pre-built templates for common use cases: Lead Generation Agent, Customer Support Agent, Appointment Booking Agent, Property Showcasing, and more.
You can filter by industry (Banking & Finance, Healthcare, Hospitality, Insurance, Real Estate) or by function (Customer Support, Lead Generation).
Pick the template closest to your use case and click "Use template."
For this walkthrough, we selected the Appointment Booking template. Here is what the flow looks like the moment it loads:
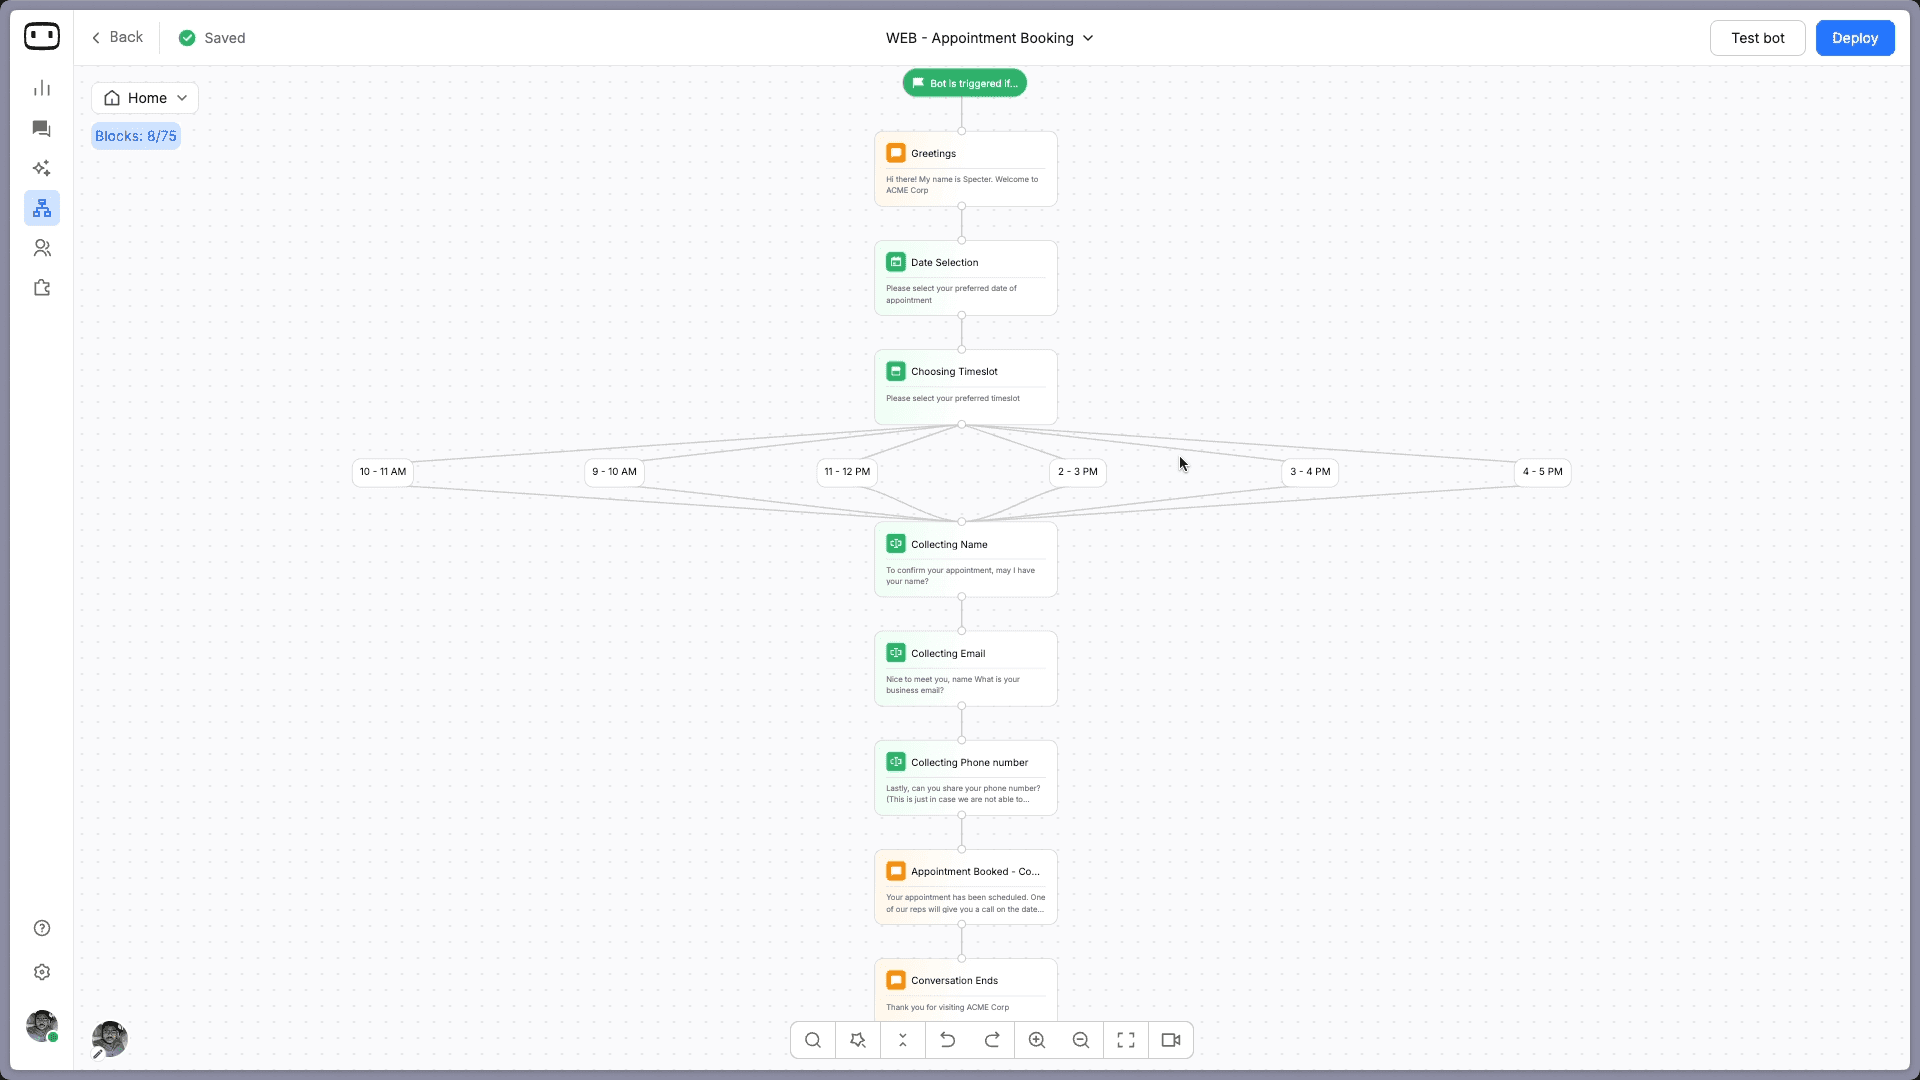
The template comes pre-built with a complete conversation sequence.
It starts with a trigger block that defines when the chatbot appears.
Then a greeting message: "Hi there, my name is Specter. Welcome to ACME Corp." Next, a date selection block with a calendar picker, followed by a timeslot selection with button options (9-10 AM, 10-11 AM, 11-12 PM, 2-3 PM, 3-4 PM, 4-5 PM).
After the visitor picks a slot, the flow collects their name ("To confirm your appointment, may I have your name?"), email, and phone number.
It closes with a confirmation message and a polite end to the conversation.
Every block in this flow is editable. Click any block, modify the content in the side panel, and the flow updates in real time. You can change the greeting to match your brand, adjust available timeslots, add or remove data collection fields, and rewrite the confirmation message. The entire structure is drag-and-drop, so rearranging or adding new blocks takes seconds.
This is a rule-based chatbot. Every path is pre-defined by you. The chatbot follows the script you set, which means the behaviour is completely predictable and the setup can be done in under an hour.
Building from Scratch (for AI-Powered or Custom Chatbots)
If you click "Build from scratch" instead of selecting a template, you land on a blank canvas with a single green "Bot starts" block.
This is your starting point. Click the "+" below "Bot starts" to open the action blocks panel. You will see tabs for Collect, Talk, Dev, AI, Logic, and Integrations.
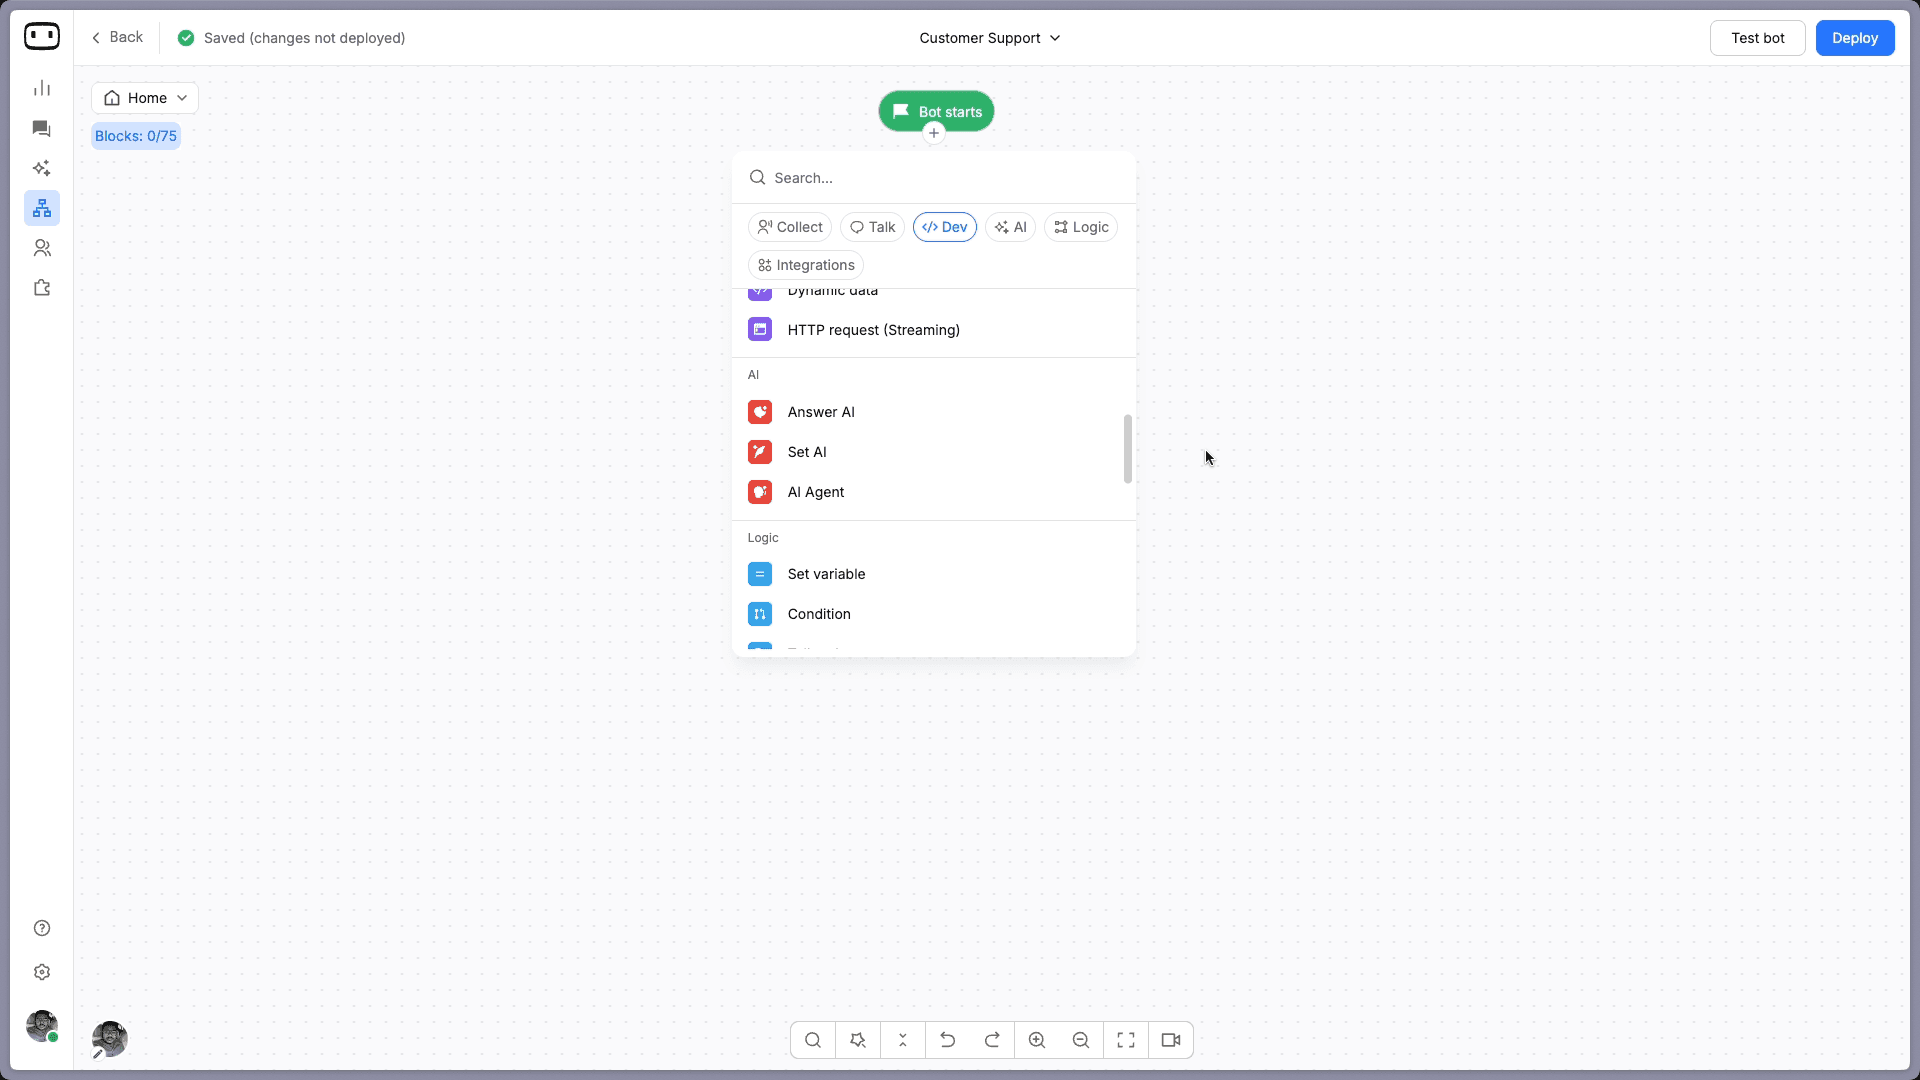
For an AI-powered chatbot, click the AI tab and select the AI Agent block. This is where the chatbot stops following a script and starts generating responses based on a knowledge base and the instructions you give it.
The AI Agent block has four components you need to configure:
Prompt: This is the most important part. The prompt tells the AI how to behave, what tone to use, what to include in responses, and what to do when it doesn't have an answer.
A vague prompt like "Answer customer questions about our product" produces generic, inconsistent responses. A specific prompt produces a chatbot that actually sounds like it belongs on your website. Here is an example of what a good prompt looks like:
"You are a support assistant for [Company Name]. Your name is [Bot Name]. Answer questions using only the information in the knowledge base. Use a friendly, professional tone. Keep responses under 3 sentences unless the user asks for more detail. If the answer is not in the knowledge base, say 'I don't have that information, but let me connect you with our team' and collect their email address. Never make up information. Never discuss competitor products."
The difference in output quality between a vague prompt and a specific one is significant. The specific prompt gives the AI a role, boundaries, a tone, a format, and a fallback behaviour. You can also use the "Generate prompt" button to get a starting point and refine from there.
Knowledge base: Enable "Use data from knowledge base" and create one. You can train it by adding your website URL (WotNot crawls and indexes the pages), uploading documents like PDFs or Word files, or entering text directly.
The more sources you connect, the more accurate the responses. Set a refresh frequency (daily, weekly, or monthly) so the knowledge base stays current as your content changes.
Functions: These let the AI agent take actions during the conversation, not just answer questions. For example, you can create a function to fetch order status, check appointment availability, or cancel a booking. This is what separates a basic FAQ bot from one that can actually do things.
LLM settings. Choose the AI model (WotNot supports OpenAI, Anthropic, Gemini, and Mistral), set the response creativity level (temperature), and configure token limits. Different models consume different amounts of AI credits, so you can balance quality with cost based on your use case.
Once the AI Agent is configured, you can add blocks around it. A welcome message before the AI takes over, buttons for initial routing, or a fallback path that collects contact details when the AI cannot resolve a query.
And that is also how you build a hybrid chatbot: use structured blocks (messages, buttons, forms) for the parts of the conversation where you want predictability, and connect an AI Agent block for the parts where visitors ask open-ended questions. The two approaches work together in the same flow.
Start building, not just reading
Build AI chatbots and agents with WotNot and see how easily they work in real conversations.

Start building, not just reading
Build AI chatbots and agents with WotNot and see how easily they work in real conversations.
Start building, not just reading
Build AI chatbots and agents with WotNot and see how easily they work in real conversations.

Step 4: Test Your Bot
Testing is the step most teams rush through, and it is where the most avoidable failures originate.
WotNot has a built-in testing panel. Click "Test bot" in the top right corner of the builder, and a live preview opens alongside your flow. You can walk through the entire conversation as if you were a visitor on your website.
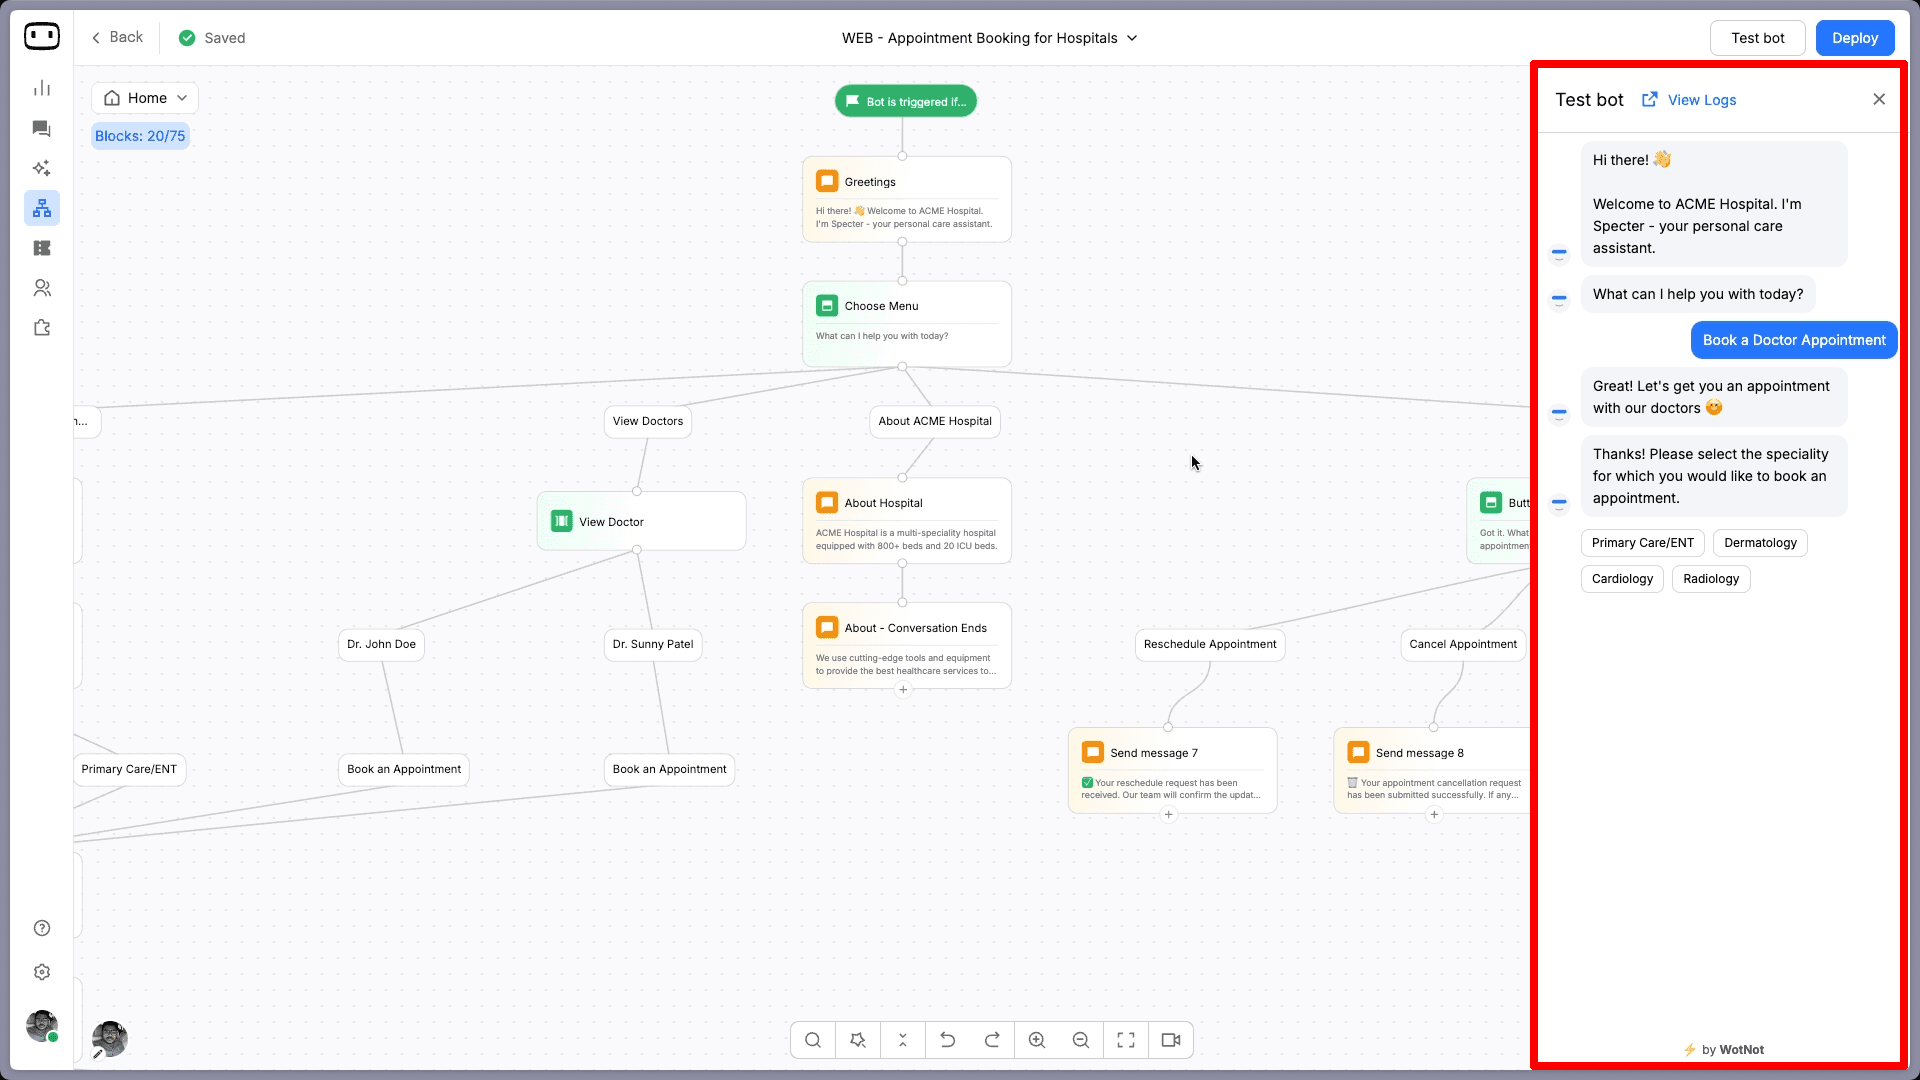
Do not just test the happy path where everything goes perfectly. Test the edges:
For template-based flows: Click through every branch. Make sure every timeslot button leads to the right next step. Verify that form submissions capture the data correctly. Check that no path ends in a dead end where the user gets stuck with no options.
For AI chatbots: Ask questions that the knowledge base should answer and verify accuracy. Then ask questions that the knowledge base should NOT answer and verify the fallback works. Ask the same question in five different phrasings and check for consistency. Test with typos, incomplete sentences, and questions that mix two topics.
For both types: Test on mobile. The chat widget behaves differently on smaller screens, and most of your users will be on their phones. If you have set up a handoff to a human agent, test that the transition works and the agent receives the full conversation context.
Involve someone outside your team in testing. The person who built the chatbot already knows the "right" way to interact with it. A fresh user will find the gaps you missed.
Step 5: Deploy and Start Measuring
Once testing is complete, click "Deploy" in the top right corner of the builder. For a website chatbot, the platform generates a lightweight JavaScript snippet. Copy and paste it before the closing body tag on every page of your website where you want the chatbot to appear.
If you use Google Tag Manager, create a new custom HTML tag and paste the snippet there instead.
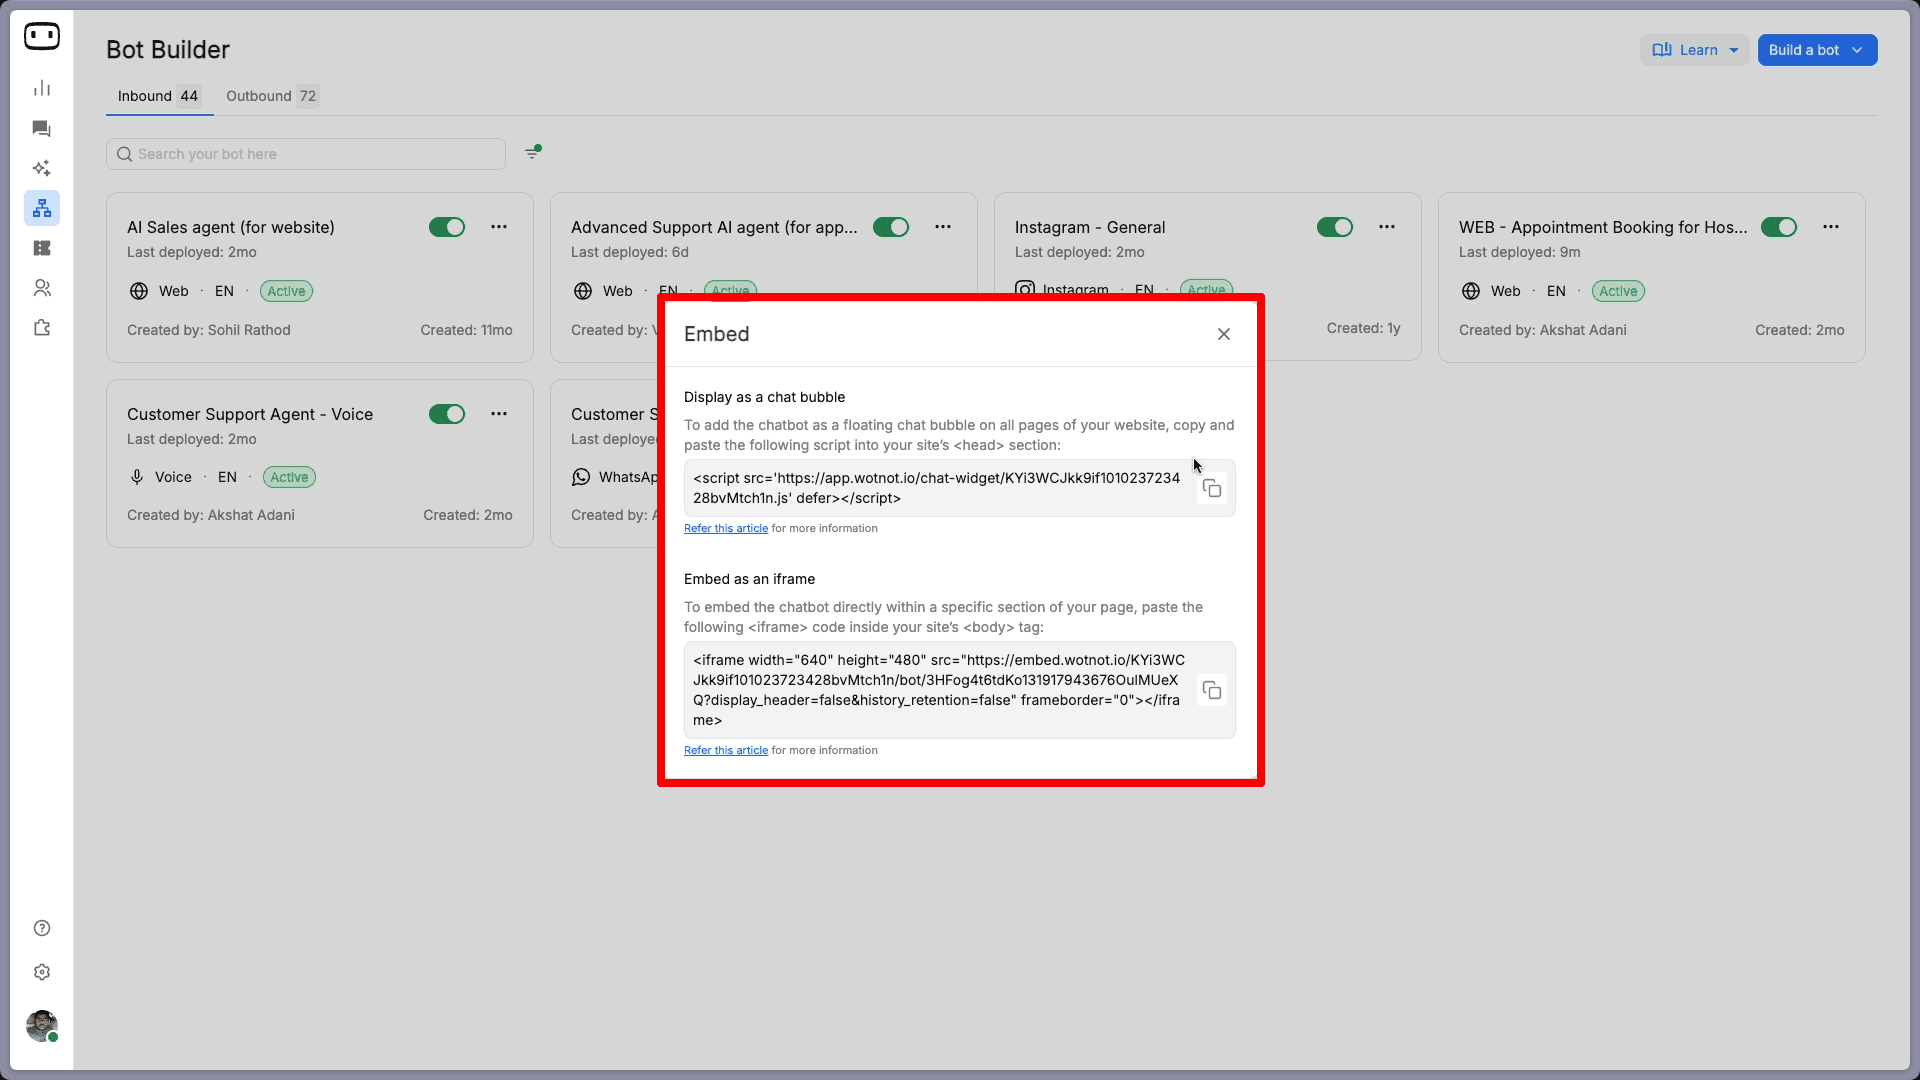
For WhatsApp, Instagram, or other messaging channels, connect your business account through the platform's integration settings in the same deployment step.
But deployment is not the finish line. It is the start of a learning period.
For the first 30 days, focus on collecting data rather than making changes. Track conversation volume, resolution rate (how many queries the chatbot handles without human intervention), drop-off points (where users abandon the conversation), and user satisfaction if you have a feedback mechanism in place.
After 30 days, the patterns will be visible. You will see which questions the chatbot handles well, which ones it struggles with, and where the knowledge base has gaps. Use that data to refine: update the knowledge base, adjust prompts, fix flow branches that are underperforming, and expand to additional use cases once the foundation is stable.
Common Mistakes That Break a Chatbot on Day One
I have watched enough first deployments go sideways to know exactly where they break. It is almost always one of these four things:
Trying to automate everything at once:
Start with 3 to 5 high-volume, low-complexity interactions. Get those working well before expanding the scope. Once you have the basics running smoothly, you can layer in chatbot productivity tools to streamline workflows further. The temptation to cover every possible scenario in the first version leads to a chatbot that does everything poorly.Skipping the fallback design:
Every chatbot hits a limit. The question is what happens at that limit. If the answer is "nothing" and the user gets stuck, trust erodes fast. Always build a clear path from the chatbot to a human, whether that is a form to collect contact details or a live chat handoff with full context.Neglecting the knowledge base:
An AI chatbot is only as good as the data it draws from. Outdated help articles, contradictory policy documents, and product information from two versions ago will all surface in customer responses. Audit your content before connecting it to the chatbot.Launching without testing edge cases:
The first version of every chatbot has blind spots. Users will type things you did not anticipate. They will ask questions that fall between two categories. They will test your fallback. If you did not test those scenarios first, your customers will, and their tolerance for a bad experience is lower than yours.
Your Chatbot Is Closer Than You Think
If you have read this far, you already know more about building a chatbot than most teams do when they launch one. The steps are not complicated. Define what the chatbot should do, pick the right type, build it, test the edges, and go live. The whole process can take a single afternoon.
Where most teams hesitate is not the build. It is the decision to start. They want the perfect use case, the perfect flow, the perfect set of prompts before they press deploy. But the best chatbot is not the one you plan for six months. It is the one you launch, learn from, and improve.
If you want to build a chatbot from scratch and see how quickly it comes together in practice, WotNot offers a 14-day free trial with no credit card required.
Start small. You will be surprised how far a simple bot can take you.
FAQs
FAQs
FAQs
How much does it cost to create a chatbot?
Can I create a chatbot without coding?
How long does it take to build a chatbot?
What is the best platform to create a chatbot for a website?
What is the difference between a chatbot and an AI agent?
ABOUT AUTHOR

Hardik Makadia
Co-founder & CEO, WotNot
Hardik leads the company with a focus on sales, innovation, and customer-centric solutions. Passionate about problem-solving, he drives business growth by delivering impactful and scalable solutions for clients.

Start building your chatbots today!
Curious to know how WotNot can help you? Let’s talk.
Start building your chatbots today!
Curious to know how WotNot can help you? Let’s talk.


